Print your photos with Picta

iPhone photography tips and tricks
Get the most out of photography and camera abilities with your iPhone
Whether you have an iPhone X, an iPhone SE, iPhone 15 Pro MAX or anything in between you want to take good pictures with your camera and the cameras on iPhones are pretty good, but there’s a lot to the software that you can learn, including techniques to get the best shots possible.
Table of Contents
Let’s get started on getting the most out of your camera. Go into your camera settings and turn on grid: that’s going to put a 3×3 grid overlay on your iPhone’s camera app. This is fantastic not just for using this rule of thirds technique that I’m about to talk about but also just for getting good symmetry and leading lines and making sure that your shot is balanced and aesthetically pleasing.
1. Technique navigation
Setting up the rule of third
The rule of thirds is basically putting your subject on one of the intersecting lines on the third, the left third or right third of your shot.
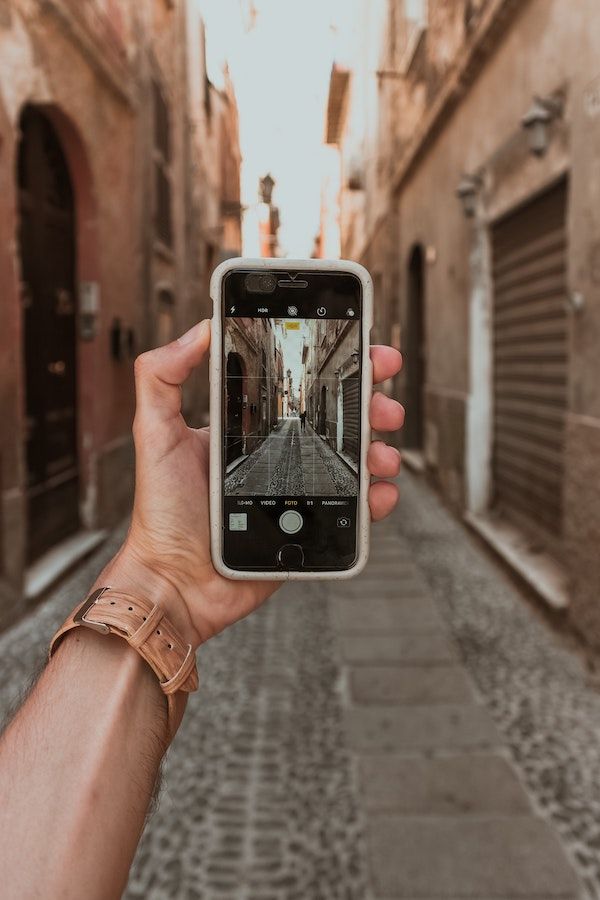
Additionally if you are framing a shot this is perfect for making sure that lines line up to the grid. You can make sure that the lines to this street (see photo) are matching the lines on the camera grid and this will make sure it’s balanced and it’s straightened out as well now this also can help turn a really boring shot into something just a little bit more pleasing.
Adjusting the exposure
Using the grid helps with the rule of thirds but also using leading lines and symmetry to get really good looking shots. It’s a really great technique now iOS 14 also allows you to customize your exposure apart from your focus. Previously you could focus and lock your focus by holding on an area and it would lock the focus on that area: so if you move your camera back it will be unfocused and then you can manually adjust the aperture too but you couldn’t do both at the same time.
Well, now you can actually lock your focus or change your focus have it on autofocus but then change your exposure and have that locked rather than the focus. So if you have a compatible iPhone on iOS 14, you’re going to hit the plus minus button to access this exposure compensation control (ECC). You can drag it from minus two to plus two to manually adjust the exposure and so it will adjust depending on what your light source is. It will have that basically overlay of minus two to plus two and then you can adjust your focus separately.
2. Navigating the actual camera app
Photo and video modes
For getting started if you just wanna take an image you just tap the shutter button. Now if you wanna get into a quick video: you can hold the shutter button and it will start taking a video and then you let go and it stops taking that video. This is called a quick take video so if you go into your camera app and you’re in the photo setting you can very quickly start a video just by holding it down and then you slide that to the right it will put the video on full time so you can let your hand go and it’ll keep recording and then you can take a picture if you want by clicking the little image shutter button down.
Now if instead what you want to do is take a burst mode picture so take a bunch of rapid shots such as if you’re doing an action shot or somebody playing a sport you still hold down the shutter button like you used to do for the burst mode then you slide to the left instead of to the right, it’ll start a burst mode counting. Now the thing to note here is that you do have to be pretty quick with it: you have to slide it over quickly so if you just hold it a little bit too long you won’t be able to get into the mode and we’ll just go into the recording mode. If you want to change the settings for your shot and for your picture you can just swipe up to reveal it and swipe down and push it back and you can see all of your settings pop up down there and again if you swipe down those disappear.
Using the flash
When you swipe up you have several settings including flash. So if you tap on flash you can choose between auto and the phone will decide whether it uses the flash or not or you can have it turned on so that it definitely will use the flash or off so that it definitely won’t use the flash. You just have to be careful which one you’re in.
Ratio aspect of the photos
You can choose your aspect ratio so for instance if you’re used to be posting something to Instagram where it only had the square, you might want to take a square picture to begin with. Now that Instagram allows you to post different sizes that doesn’t matter as much being choose 4×3 or even 16×9 if you really want to fill up your screen for a shot which looks pretty good.
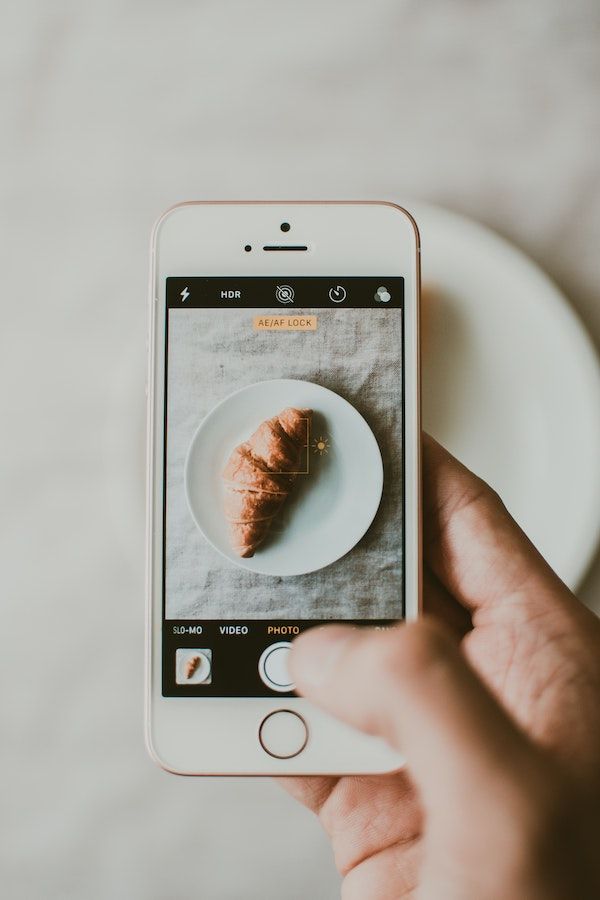
Let’s go back to 4×3 which is the standard. Here you have exposure and this allows you to increase and decrease the exposure or the brightness. If you tap it’ll go back to auto exposure and wherever you tap it’ll expose for that but then you can also manually adjust it and you can also tap and then slide up and down on this little control here to do that same thing then to the right of that is your timer and by default timer is off. If you want a three second timer or a 10 second timer.
Filters and profiles
Finally you have filters which you can see different color filters and profiles so you can put over your images. It doesn’t matter if you do this before or after you take the picture because either way you can still edit it and put it back to normal or original if you want to.

3. Finding different settings in the setting app
Let’s go ahead and look at some of the actual settings that you can change within the settings application and under camera and photos.
Photo formats
One of the things you see up top is formats and there’s two options: high efficiency which is going to use Apple’s own codec for HEIF and HEVC format photos and videos, or you can do the most compatible which is going to do JPEG and H264.
Basically, there’s two options here:
- One is going to be able to be sent and viewed anywhere which is going to be the most compatible one (so again that’s JPEG and H264 which are file types for photo and video respectively that any software, anybody is going to be able to open and receive and view).
- Then, you can use high efficiency which is basically going to cut your file sizes in half so this is an awesome way to save storage especially if your device doesn’t have a lot of storage to begin with. Now Apple can convert this automatically to JPEG or H264. If you’re sending it somewhere that can’t support it otherwise, this is probably the best option for you to do but if you want something that’s going to be larger file sizes but simply more compatible you do have the option of changing that.
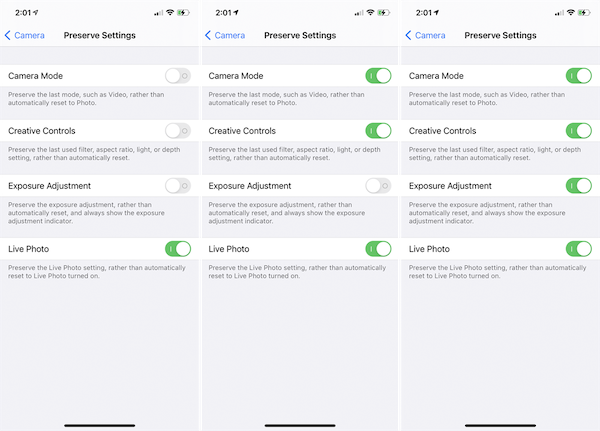
Saving preferences
You also have a preserve settings setting and if you go in here this basically allows you to keep certain settings every time that you leave and come back to the camera application. So every time that you go into the camera application and then you leave it and you come back to it, the settings will remain the same. This includes camera mode so that way every time that you go to a certain mode whether it be video or photo or portrait or whatever it is, and then you leave it’ll stay there so you can turn that on or off creative controls will do things such as the aspect ratio and the light and the filters which we looked at in the last segment it’ll keep those and then exposure and then live photo it’ll keep live photo wherever you last had it on.
By default it’ll automatically reset to turn it on but you can also turn the setting on if you want it to remember what you had last time if you had it turned on or off. You also have a setting for use volume up for burst. So by default if you hold down one of the volume keys it’s going to do the quick take video that we looked at in the last segment.
It’s just going to start a video and stop filming when you let go of the button, but what you can also do is turn on the setting that I just showed you which is use the up volume button for burst. So now if I hold down the up volume button it will go into burst mode until I let go and then turn it off. There’s also view outside the frame which is pretty cool: this basically allows you to just see down here at the bottom slightly outside of your frame so it’s slightly blurred out so you can see what it would look like if you were to step back or zoom out.
4. Practical tips and features
So now let’s look at some different features of the camera application when you’re taking photos. One of my favorite ones is live photo.
Live photo
Live photo is this little guy that lives up top and when it’s turned on it will be yellow and you can have it turned off as well. A live photo records before and after you take a picture and you can turn it essentially into a video. Live photo is going to be recording slightly before and slightly after; this will let you capture things that you thought you had just missed but it’ll actually be recording a little bit of audio and a little bit of video that way. When you go back and you long press it you can see that it recorded that entire segment and not just the picture.
Once you have a live photo, you are able to edit it. So you go in and you go down to the bottom where there’ll be a little live photo option and then you can move and find the frame that you want say there’s a better frame.
There’s also a few different cool options you can do with this. You can turn on effects so you can do live loop balance or long exposure. This will do different things with that live photo and also within the share sheet you are able to save live photo as a video. So if I do that it just turns this into a video and you see that photo is now a video that I can send. If you just recorded like a really cute baby or something and you want to turn that picture into a video live photo is an awesome way of making sure that that’s possible. If you go into here, you can turn the sound off and then click done and this will not have any sound so that’s where you can change the sound settings to make sure that you don’t have sound if you don’t want there to be sound.
Sorting and labelling images
A cool feature is also the ability to add a caption so if you swipe up you can add a caption. I go into the photos application and I type in airpods there it’s going to show up right there and this is perfect for labeling and categorizing and just sorting your images. You can also search by location so if I know of a certain shot that I want and I know where it was taken but not when, I can search a location.
Portrait mode
Now if you have a compatible iPhone with portrait mode you can swipe over to get into that menu and then you can see the different toggles in a different portrait mode so you can swipe between and you can choose these now.
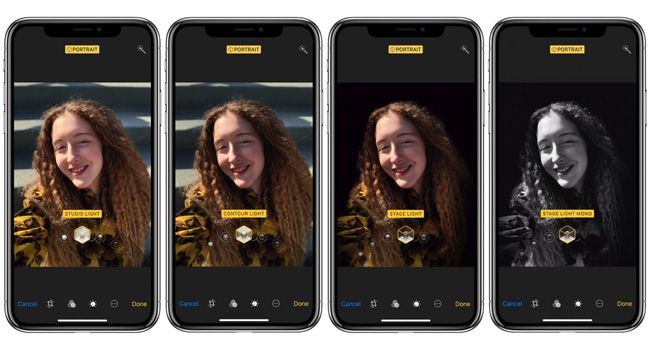
You can also choose them later so you don’t have to decide before or after and there are two controls to the top left in this view: one is the hexagon and that controls the intensity of the effect that you just applied and then the other one the f or the f-stop for the aperture controls how blurred out your background is from f1.4 to f16 depending on which device you have. So the more or less blurred out and you can change this later too you don’t have to do it now. Also in the edit screen you can change the type of filter that it is as well so stage light or high key mono or natural light.
Editing your photos
Whatever you want to do you can customize these before, during or after. Now if you click edit and then you click the three dots at the top you will get the option to mark up the image and this is pretty cool so in here you can use a bunch of different tools:
- A pen.
- A highlighter.
- A pencil.
- An eraser.
You can also press the plus button to add a text box or shapes, like a signature or arrows or anything. You can really customize an image and mark it up and this is a cool tool for trying to highlight something and send it to somebody.
If you just stay in the edit menu you will have lots of controls for adjusting your image and you can do auto and iOS will try to do its adjustments that it finds best or you can go through and modify as you want. If something was not balanced or if something’s kind of off axis you can try to even it back out using either of these tools here for the vertical and horizontal axes and then you can also flip it left to right or rotate it up and down. Finally you can change the aspect ratio so 16 by 9 like a video or 10 by 8 or 4×3 as it is by default and then you can go back to original as well and click done.
If there’s a picture you really like and you want to add it to your favorites you can just click the heart down there and this will go into an album called favorites which you can see in the albums view and you can also use this as a search tool.
Those are a lot of the basics for taking pictures with your iPhone both in terms of technique, navigation and features.
Guide written by:
Stephanie, Freelance Photographer